


Follow Us on Pinterest
Unable to load Pinterest pins for 'FrancesSuzanne'

Apr
20

Some sewing projects are like a marathon.

You train / practice . . . not to win, but to finish.

You may strive for a personal best time, knowing it isn’t necessarily going to be perfection.
Ultimately, you do your best and feel a sense of accomplishment when you cross the finish line!

This is exactly how this dress makes us feel.

Is it perfect? Absolutely not.
Was it necessary for us to pace ourselves? Oh yes.
This was definitely not a sprint.

Do we feel a sense of pride and accomplishment? Yes . . . okay, a resounding YES!
Our training actually began half a lifetime ago when we took an heirloom sewing class. Basically, it was a “notebook class” where we took notes on machine settings for each technique. After “mastering” each technique, we chose a project to complete. You can see our finished creations HERE and HERE. Up until this point, we don’t believe we had completed any heirloom garment from start to finish.

Fast forward to this past January. We were discussing our options for an Easter dress for EA. She had outgrown all of our limited heirloom stash. So, we asked ourselves, “should we?” and more importantly, “can we?” EA adores heirloom dresses, and we know that it is only a matter of time until she won’t. So in the end, we decided, “Go big, or go home!”

As timing would have it, we got an extra nudge from The Sewing Room who had a 20% off sale for laces, heirloom fabric, etc. Between their selection and the 1752 Company laces available on site for the week, our imagination was the limit. The sale, paired with the shop inspiration, was the perfect combination! Finally, the assistance we received in determining the necessary supplies to make our vision a reality gave us confidence that we could indeed be successful. Everyone was so kind and even allowed us to take photos of a couple of the garments to have as references as we worked through the process. Now, we did sway a bit from our original thought process, but generally speaking it was in the same realm.

We purchased “Pretty White Dresses” and “Collars for Girls” by Ginger Snaps Designs. Then, we balked . . . because we had never sewn a dress from this pattern company, thus leading to uncertainty as far as the finished fit. The thought of sewing such an intricate dress and the prospect of it not fitting had us both on edge. So, we chose to use these patterns as added references to our heirloom technique notebook. We didn’t use the actual pattern pieces, but they were excellent resources for sewing lace and the construction process.

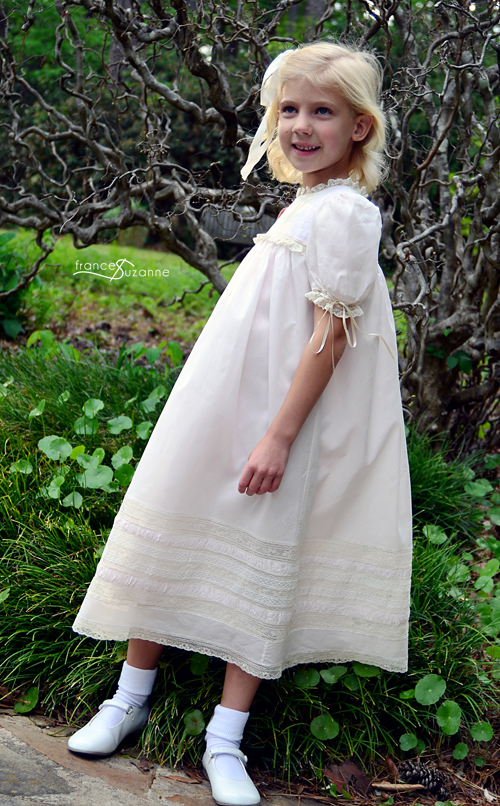
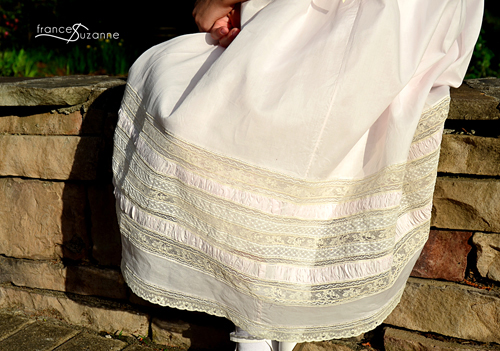
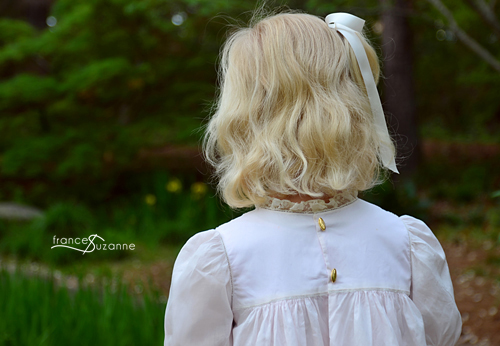
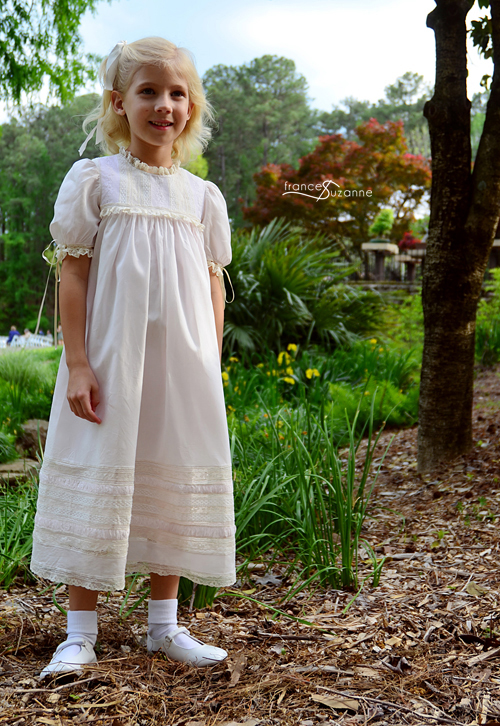
We opted instead to go with a pattern company {and fit} that was very familiar with us. Oliver + S. Don’t recognize the pattern? It’s another version of Liesl’s “Building Block Dress” and actually has pretty simple pattern lines. Empire waist, puffed sleeves, gathered skirt, lined bodice with a lace overlay, and a fancy band at the hem of the dress completed the dress. We sewed EA a size 6 {with modifications}.
After the drafting and sketching {the order of lace in various areas} was complete, we knew we needed to dye our wide, white lace to more of a natural color. We had used tea in the past and had good results. However, this time, it turned the lace a light shade of pink. Seriously. When we laid out our laces it looked like a Neapolitan dress. So, we headed to facebook, seeking advice on how to remove the “stain” so we could begin again. We asked a group who has a love for heirloom sewing and embroidery, and were given the advice to let the lace set in 1/8 c. Dawn, 1/8 c. Biz and water. It worked perfectly! The lace was white again! The same facebook group advised us to try using coffee to dye the lace instead. Our results were somewhat improved going this route, although it still had a touch of a pink coloring. We set the dye and begin the tedious process of sewing the laces for the yoke together. **Once we completed the dress, we washed the entire creation in Woolite and believe that even though we had “set the dye” on the lace it faded back to more of it’s original white color. This surprised us because our experience with Woolite is that it is considered a gentle soap.

Initially, we spent a good deal of time simply sewing laces, entredeux, and puffing together. Basically, it was a thoughtless, time consuming process. In reality, it was very relaxing . . . for the majority of the time. After sewing the lace together for the yoke, fancy band near the hemline, and sleeve lace and beading, we blocked the lace sections in hopes they wouldn’t appear stretched or skewed based on our tension when sewing. We aren’t sure that this is an actual technique that is often used, but for our dress that was “not so perfect”, it worked well!

Next, the actual construction of the dress began. For us, the most difficult part of this was in the organization of the order to complete each step. One of our favorite details is found in the entredeux used to attach the sleeves, as well as the back bodice to back skirt.
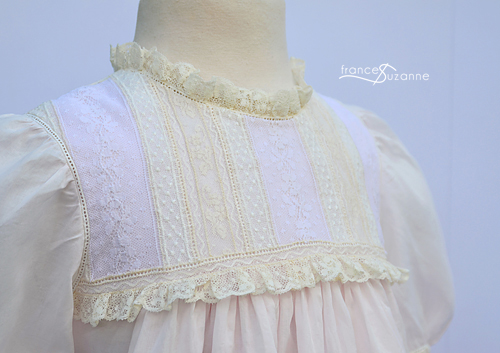
And yes, we had to go to facebook once again to request help from some of our friends. “We are going to be using beauty bars for closure, so do we interface the placket of a lined bodice, or not?” Yes, won out, and we opted to line the entire bodice with a very fine interfacing that you can purchase HERE.
As we drew closer to finishing our sewing “marathon”, we were faced with some of our hardest challenges yet. Think: 25th mile. . . aka: gathered lace to entredeux attached to the neckline. This was a difficult road block mentally for us to delve into. In the end, between the instructions in the Ginger Snap patterns combined with Liesl’s Building Block, the results were something we could be proud of! And relieved about.

As we got close to completing the dress, we began to think about the slip. “What is our best option on how to sew the slip?” Well, if you ever have a question, just head to the Oliver + S Friends facebook group where they are always very willing to help! In no time, we had an answer that we thought was perfect! Use the same drafted pattern, simply cut your neckline and armhole seams in 1/2″. This worked like a charm, as well as saved us a lot of time. So it was definitely a win – win for us. Kudos to our facebook friends!
In the end, we had one regret. As much time, effort and money as was put into this dress, we wish that she had more growing room! She is absolutely growing like a weed. Fortunately, she has two younger sisters, who {if the dress stands the test of time}, will be able to enjoy this creation too!
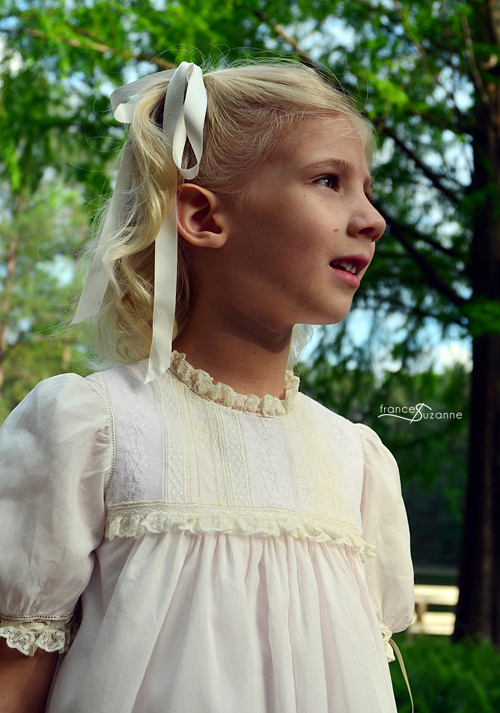
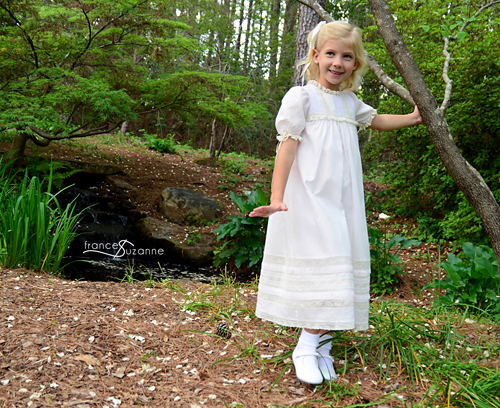
So, we know inquiring minds want to know. Did EA like her fancy dress? Have our pictures not told a story all their own? What do you think? She was absolutely all smiles, and *quite frankly* we believe she truly felt like a princess. For now, we’ll enjoy the challenge of getting her to wear something other than her fancy heirloom dress to church. Because some day, she will decide that heirloom is too “baby” for her. Hopefully, in the very distant future though.

We paced ourselves, we completed our marathon before Easter {I spy an Easter lily . . .do you?} and most importantly, we were proud of the final results!
![]()

It’s beautiful! You did a great job. I confess, when my daughters were little, I would buy simple nylon white slips from Wal-Mart to put under their heirloom dresses. I was too tired after making the dresses to make a slip. Nobody pays attention to the slip, when the dress looks like that.
Funny you should mention that . . . the 2nd niece wore a slip from a previously made dress. And, it kept trying to be the “star of the show” during our photoshoot.
It is a beautiful dress and you did a fantastic job! Makes me think of my mother, who loved to do heirloom sewing.
Thanks!! Our mom sewed a few heirloom dresses . . . entirely by hand. ABSOLUTELY CRAZY!! {And yes, she reads the blog and blog posts . . . and she would 100% agree with the above statement}.
Simply beautiful! Stunning and so EA! You ladies did an exceptional job on this special dress. I am so glad that it will be worn by more than one little princess!
Thanks, Karen!! It definitely challenged us . . . in a good way!
It is stunning, ladies! I know you didn’t intend for there to be so much contrast between white and cream, but that was actually what I first noticed before I opened your post, and it immediately attracted me as a subtle and interesting and lovely feature. I am in awe of your sewing prowess here.
Thanks Inder! The photography seems to capture the color variation more than it is evidenced in “real life” . . . or so we think. Relieved to know it gave you positive vibes!!
EA is gorgeous in her special dress! Nicely done, Aunties!
Congratulations aunties; the dress is a triumph! And EA does indeed look like a princess wearing it. I do understand what a marathon such a work of art is; about 25 years ago i made an heirloom christening frock, petticoat and bonnet. I took me three solid weeks of continuous work. Looked wonderful in the end, but I would hesitate to make another despite the fact that my sewing skills have advanced since then. I admire, and appreciate your persistence.
Its so pretty! I love it, especially the hem. So much work, but so worth it! I have never done the gathered fabric strips in between the lace and its beautiful!!!
This is outstanding! I did see some beautiful Easter dresses when I was home, but none compare to this!
Awwww, thanks!! Frantically trying to finish the 3rd {and final} of the Easter dresses this summer . . .before the youngest niece outgrows it!
This is just gorgeous! I love the puffing strips near the hem, and the ruffled lace around the sleeves and neckline. It’s just beautiful, and it’s easy to see how delighted EA is with it!
Thanks Charity!! EA has decided that she wants to sew . . .”those fancy dresses, like my Easter dress”. That delights us, although we’ve told her that “those dresses are not where one begins to sew!”