


Follow Us on Pinterest
Unable to load Pinterest pins for 'FrancesSuzanne'

Jul
13
After our initial post, Smocking: An Introduction, that was filled with smocking resources and inspiration, we knew it was time to get down to the nitty gritty! YOU were ready to start the fun!
First, we want to begin by talking a bit more about the smocking patterns, otherwise known as smocking plates. Most plates are printed on a standard 8.5 x 11″ sheet of paper and sell in the neighborhood of $5. There are many plates available as free downloads, or you may choose to create your very own! Often, one side of the page is printed in color and features the finished smocking design. On the opposite side, a color code of DMC threads used will be given, as well as written instructions and a line drawing of a smocking graph.
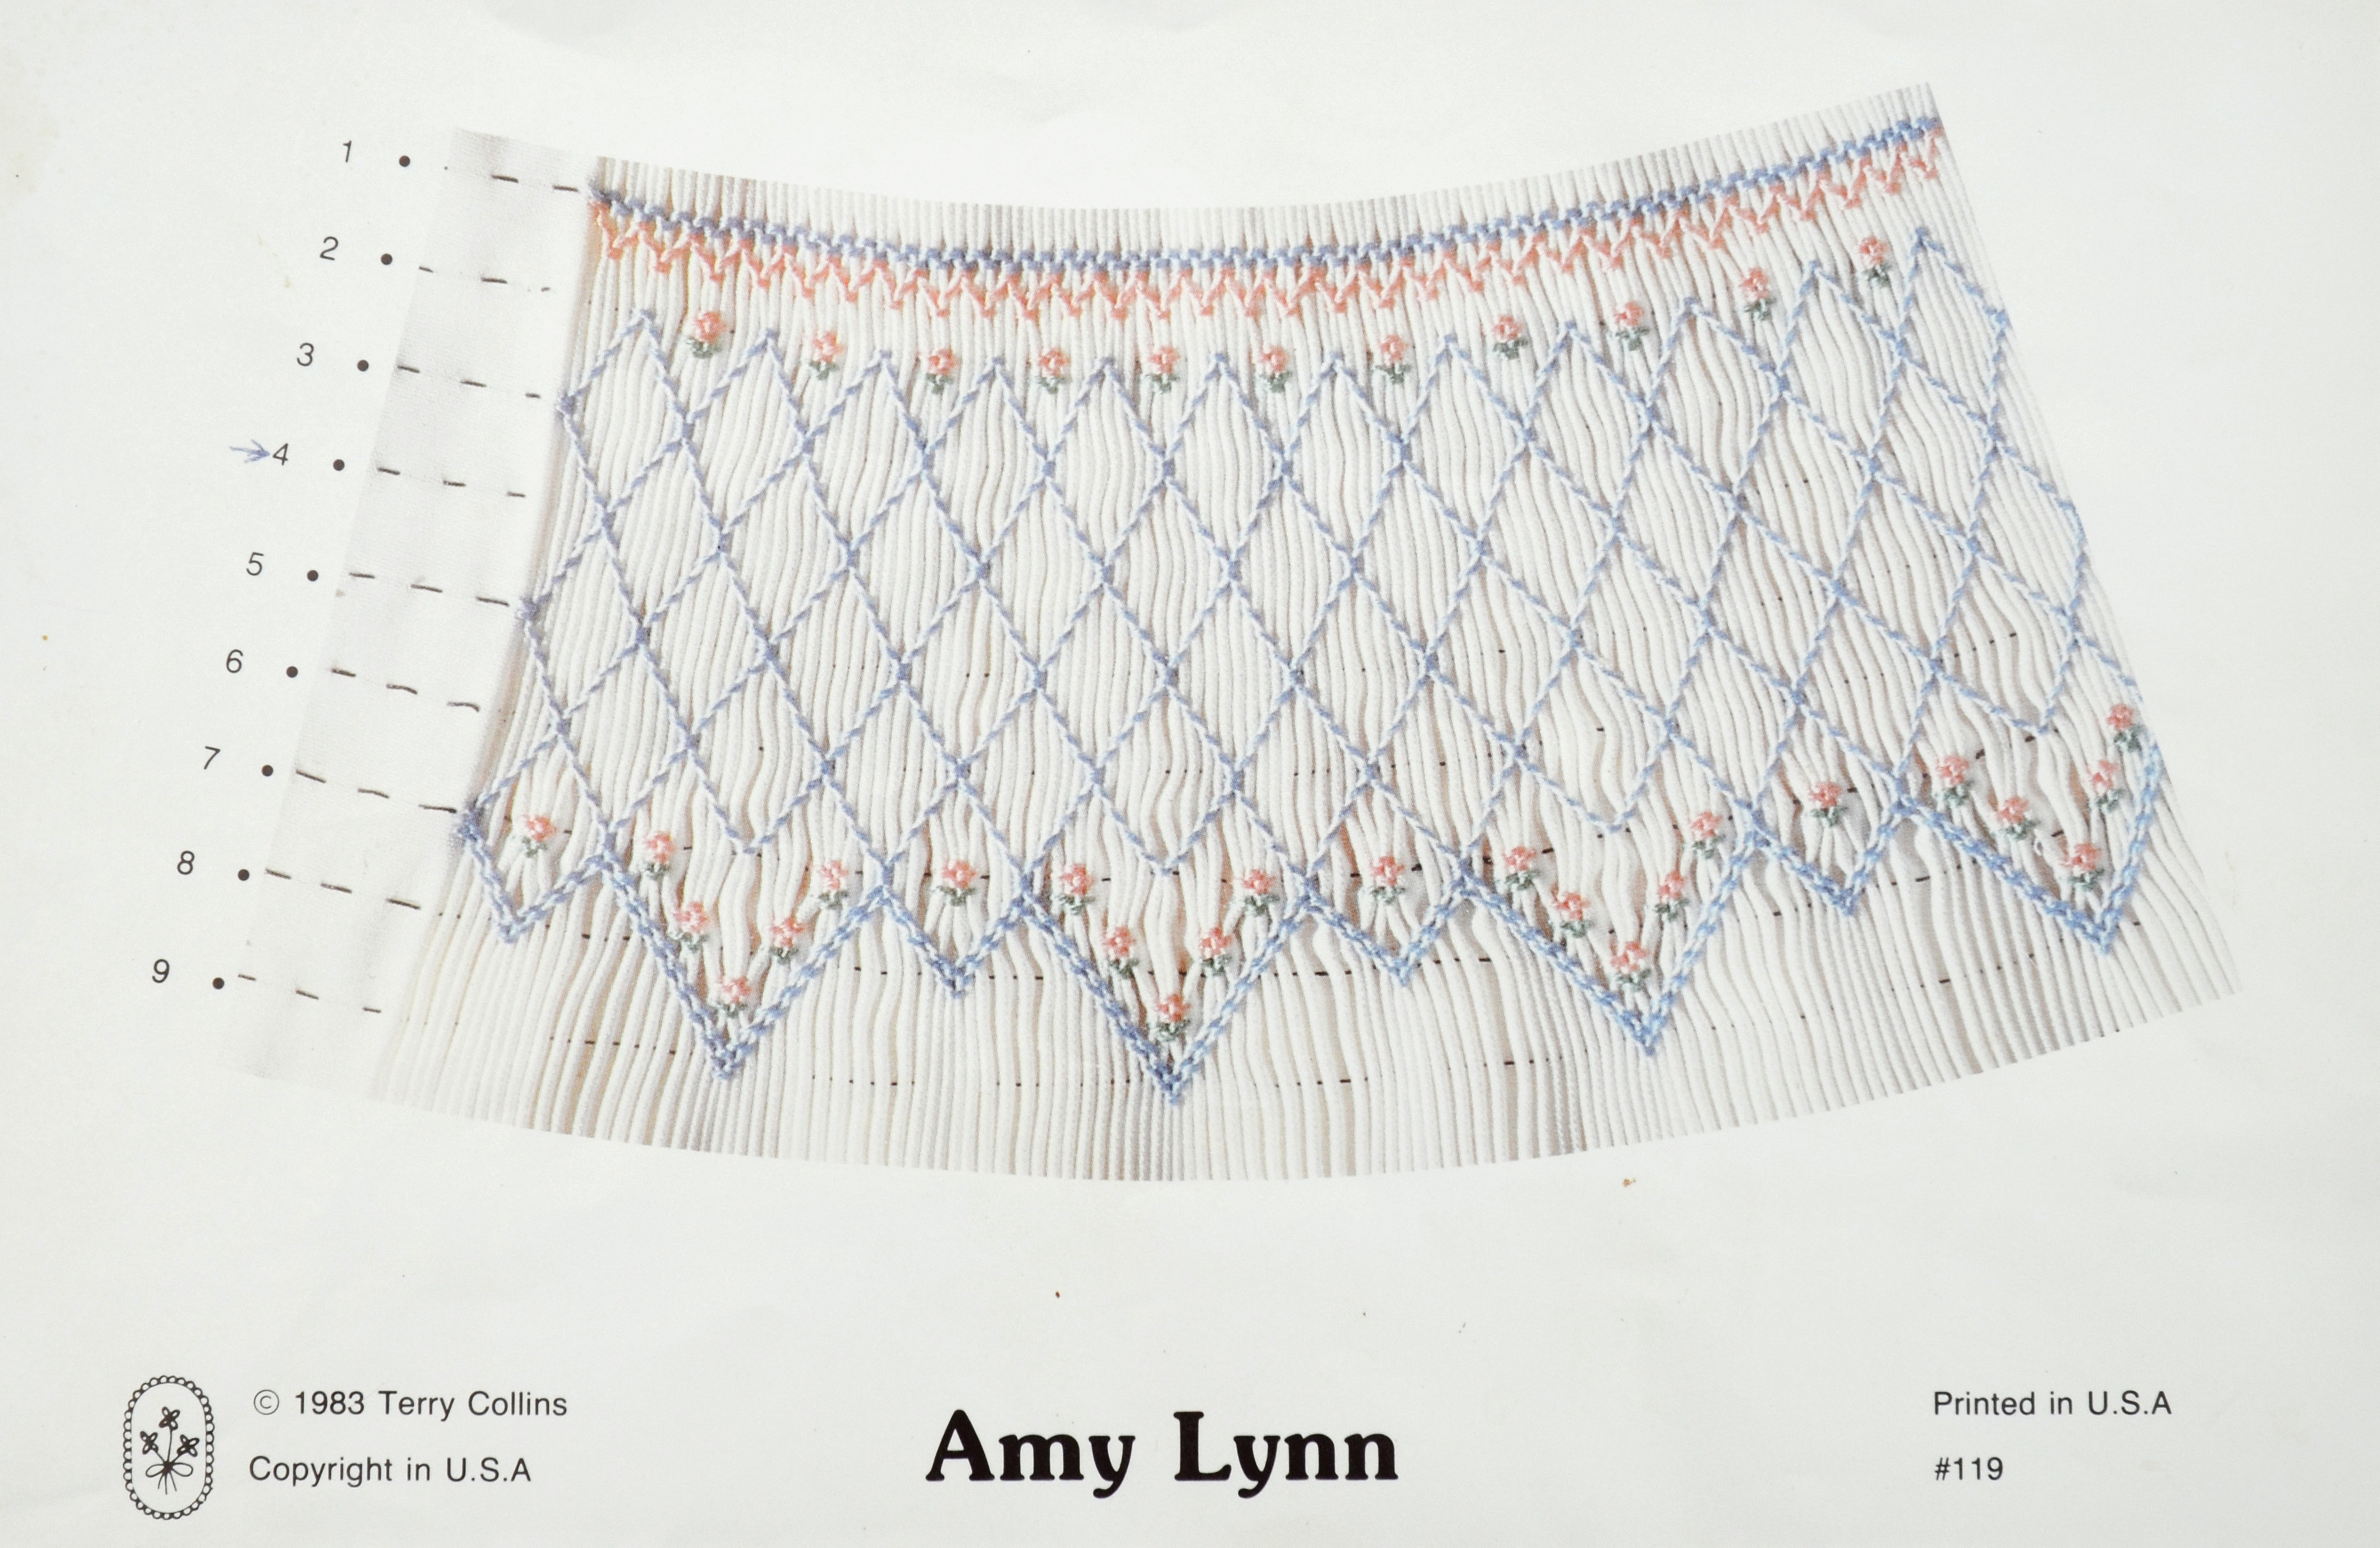
Amy Lynn, by Terry Collins, was the plate Ashley {frances} selected to smock for her first plate, in a beginning smocking class. At first, it appeared rather complex, and she questioned if she would actually be able to complete it with her limited knowledge. Yet, Ashley was assured by her teacher that she would {and you could too!}. Terry designed this plate for a bishop dress. You’ll notice that the bottom rows of this smocking plate are designed to allow the gathers of the dress to “open up”. Also, notice that this plate has 9 rows. If you were to get fabric pleated for this plate, you would ask that at least 11 rows be pleated. The top row (not pictured, above row #1 of smocking) is known as your holding row. This first row would be “backsmocked” {ie: smocked on the wrong side of the fabric} to hold the gathers together for ease of stitching on the neckband. Often, you may see an “H” listed on the smocking plate to signify this row. On a smocked insert, there are 2 holding rows: one at the top of the plate and the other one at the bottom of it, allowing for ease of sewing the garment together. On a smocked bishop or a yoke dress, the bottom holding row is not necessary because you not attaching any fabric beneath the smocked portion.
Smocking plates can be easily modified to fit one’s needs. For instance, Ashley was sewing the “Amy Lynn” as a 12 month bishop and chose to eliminate a few of the rows, so that the smocking would not be overwhelming to a young child.
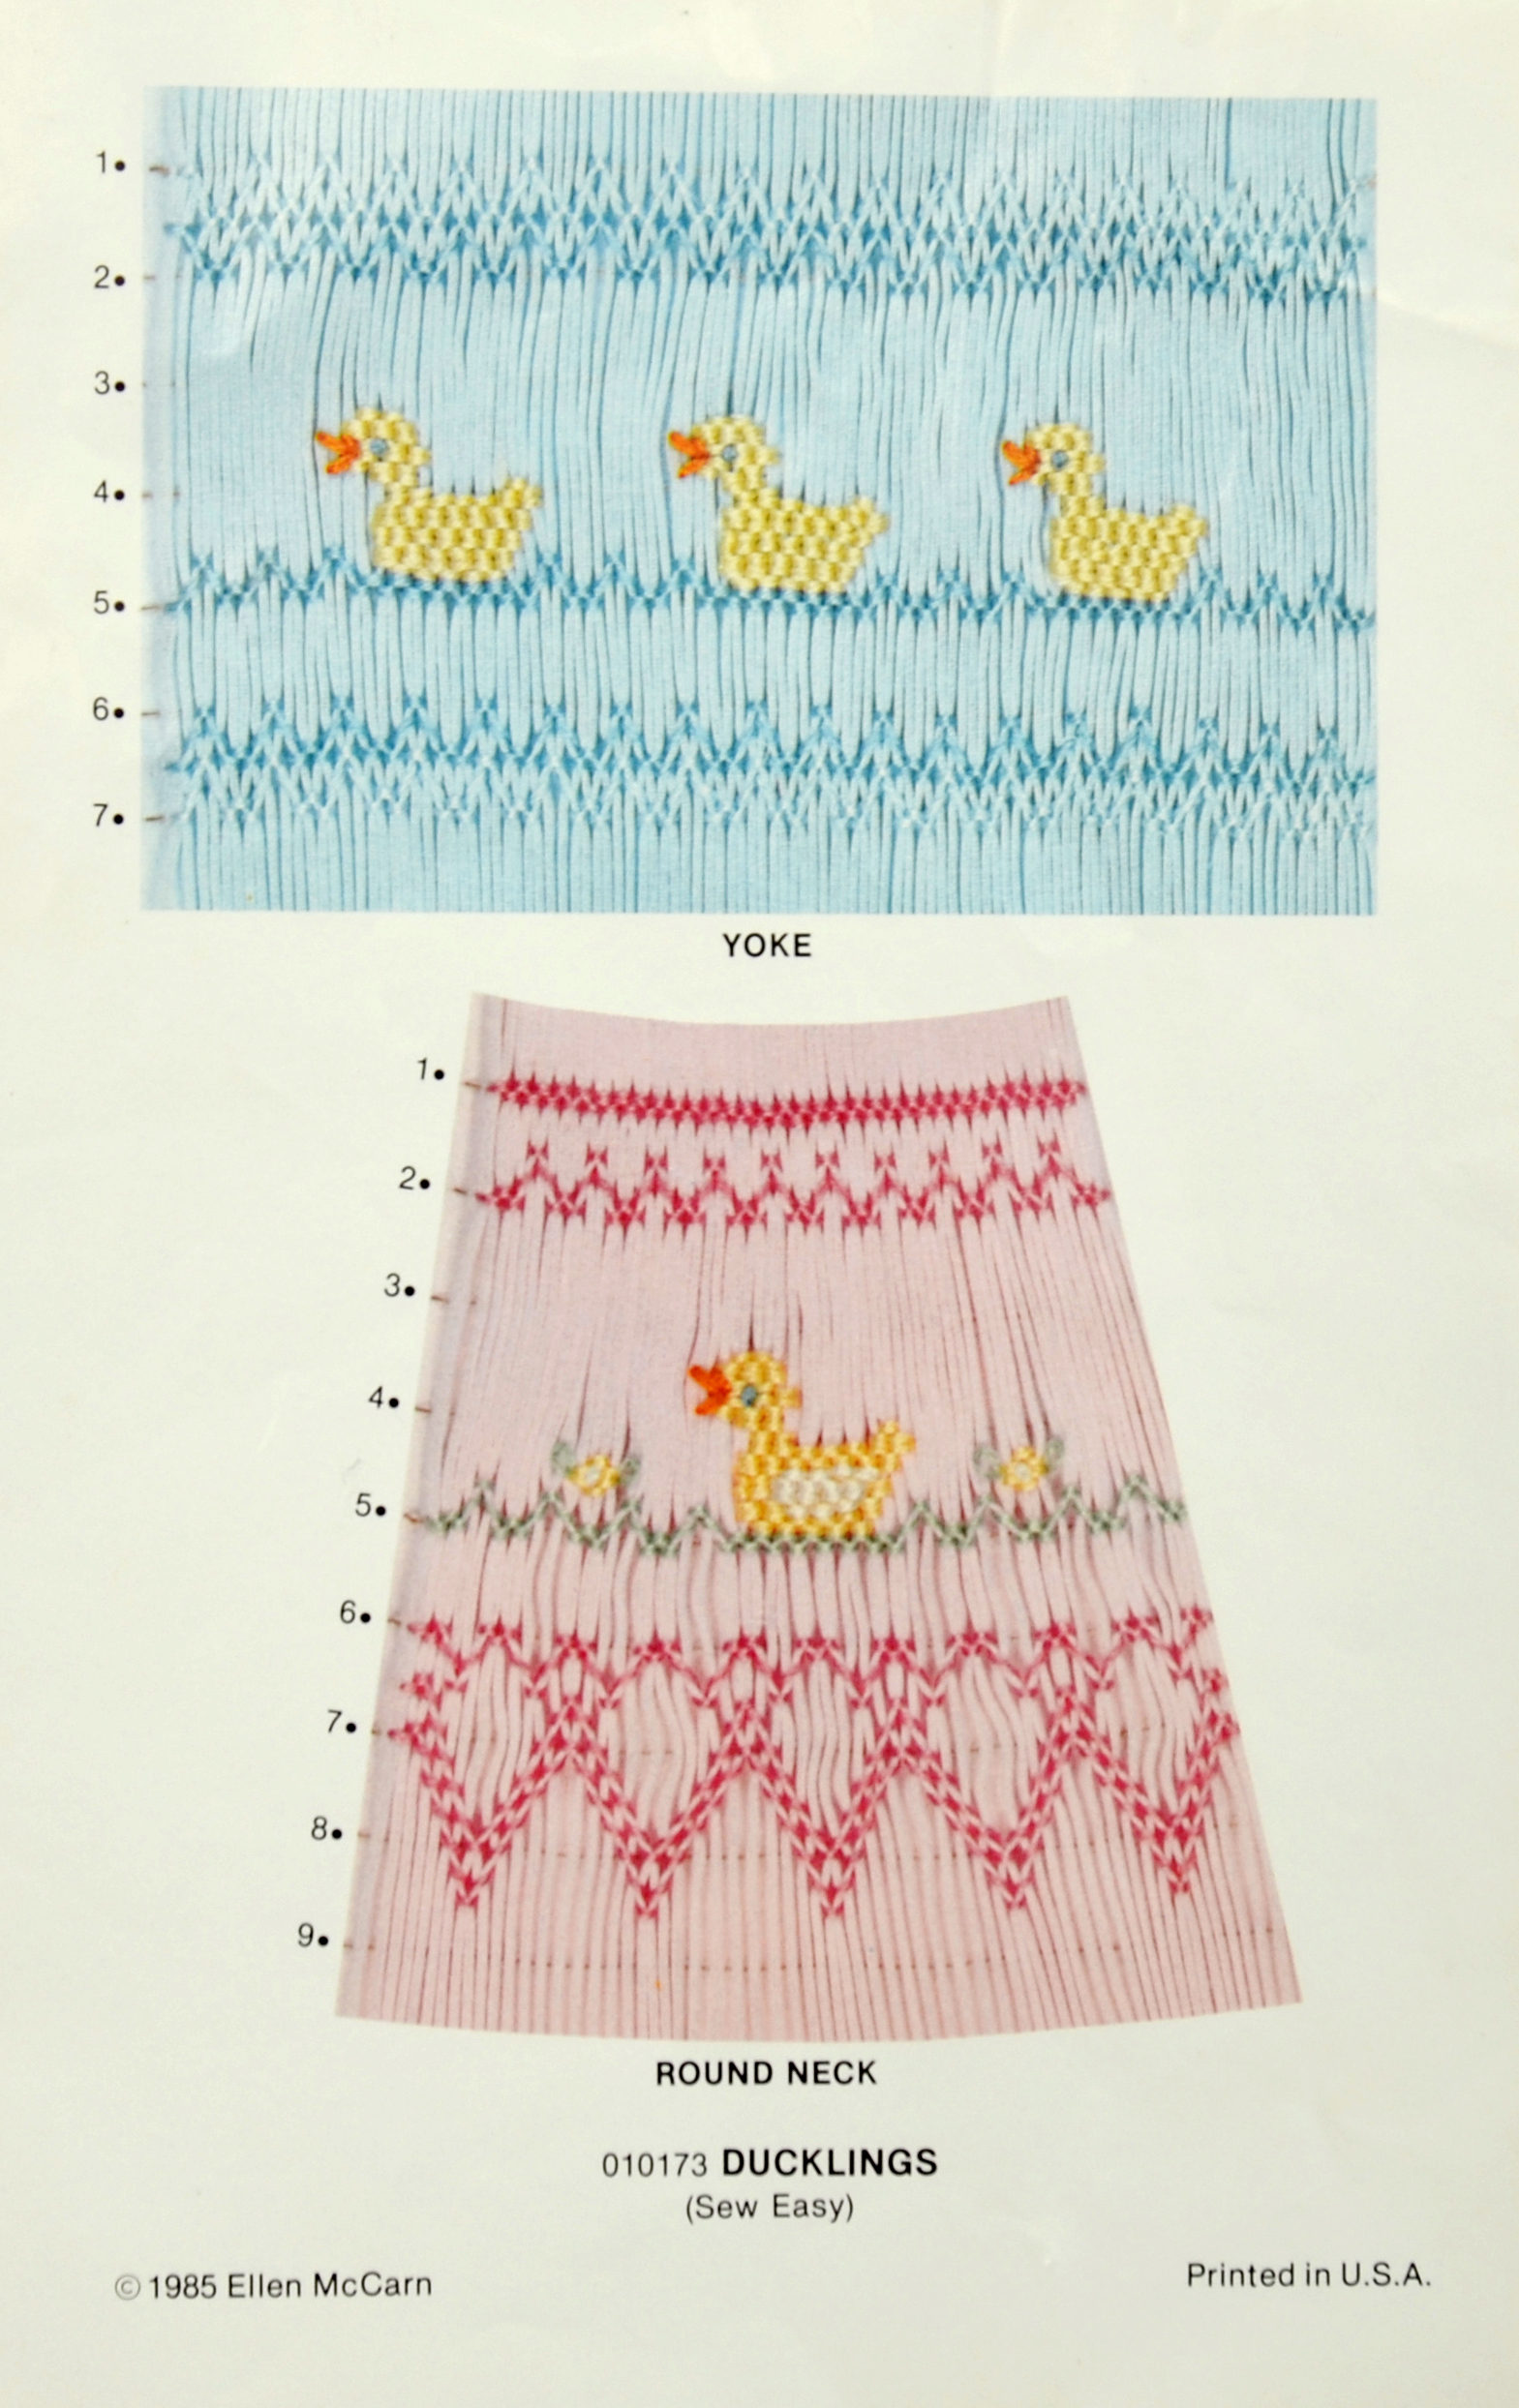
The following plate is by Ellen McCarn, who opted to give the customer two plates for the price of one in this circumstance. Both plates are primarily geometric smocking with a few ducks added {a perfect introduction to picture smocking}. The top image is labeled “YOKE”, signifying that it would be appropriate for a smocked insert or any type of square yoke. This plate appears rectangular in nature. The bottom image is labeled “ROUND NECK” and would be appropriate for a bishop dress. Again, the number of smocking rows are featured on both of these smocking designs.
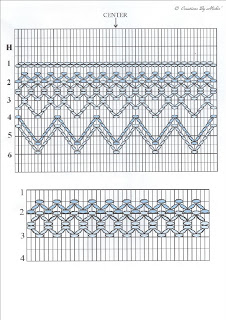
Besides the finished smocking design often pictured in color, the designer will also often feature a line graph of the stitches required. The one pictured below is a FREE smocking plate from Michie’ of Creations by Michie’. You can download the free pattern and written instructions here. In the graph, you are shown the pattern for stitching the design.
So, let’s assume you have chosen your smocking plate and determined if you are going to smock an insert, a yoke, or a bishop. What is the next step in the process? Well, lucky for you . . . we’ve created a video to show you just that! We’re also going to include the information in this post, as well as some definitions to carry you through the process.
1) In order to begin the process, you must have pleated fabric {since smocking is a 3-dimensional art}. We discussed this in our previous post, but you may pleat the fabric with a pleater, or if you are like us and don’t own a pleater you may purchase a “ready to smock” garment or pay an heirloom sewing shop to pleat fabric for you. There is always the option to pleat your own, using the “dot” method. You simply purchase iron on dots and press them on the wrong side of your fabric. Then, you gather up the fabric using the dots as a template.
2) Familiarize yourself with your pleated piece. The pleats are the vertical, parallel “hills” of the gathered fabric, while the valleys are the concave fabric between the pleats. The gathering threads are the threads used in the actual pleating of the fabric {often a thicker, stronger quilting thread}. These gathering threads for horizontal rows are used as guides for stitching. In between the rows is one full space. In the written instructions, there may be rows of varying size: 1/4, 1/2, 3/4, 1, or 1 1/2 row space. The size of a row determines how many stitches will be sewn in that area. The center of your fabric is the valley located in the center of your fabric. To determine the center, simply count all of your pleats and divide by 2.
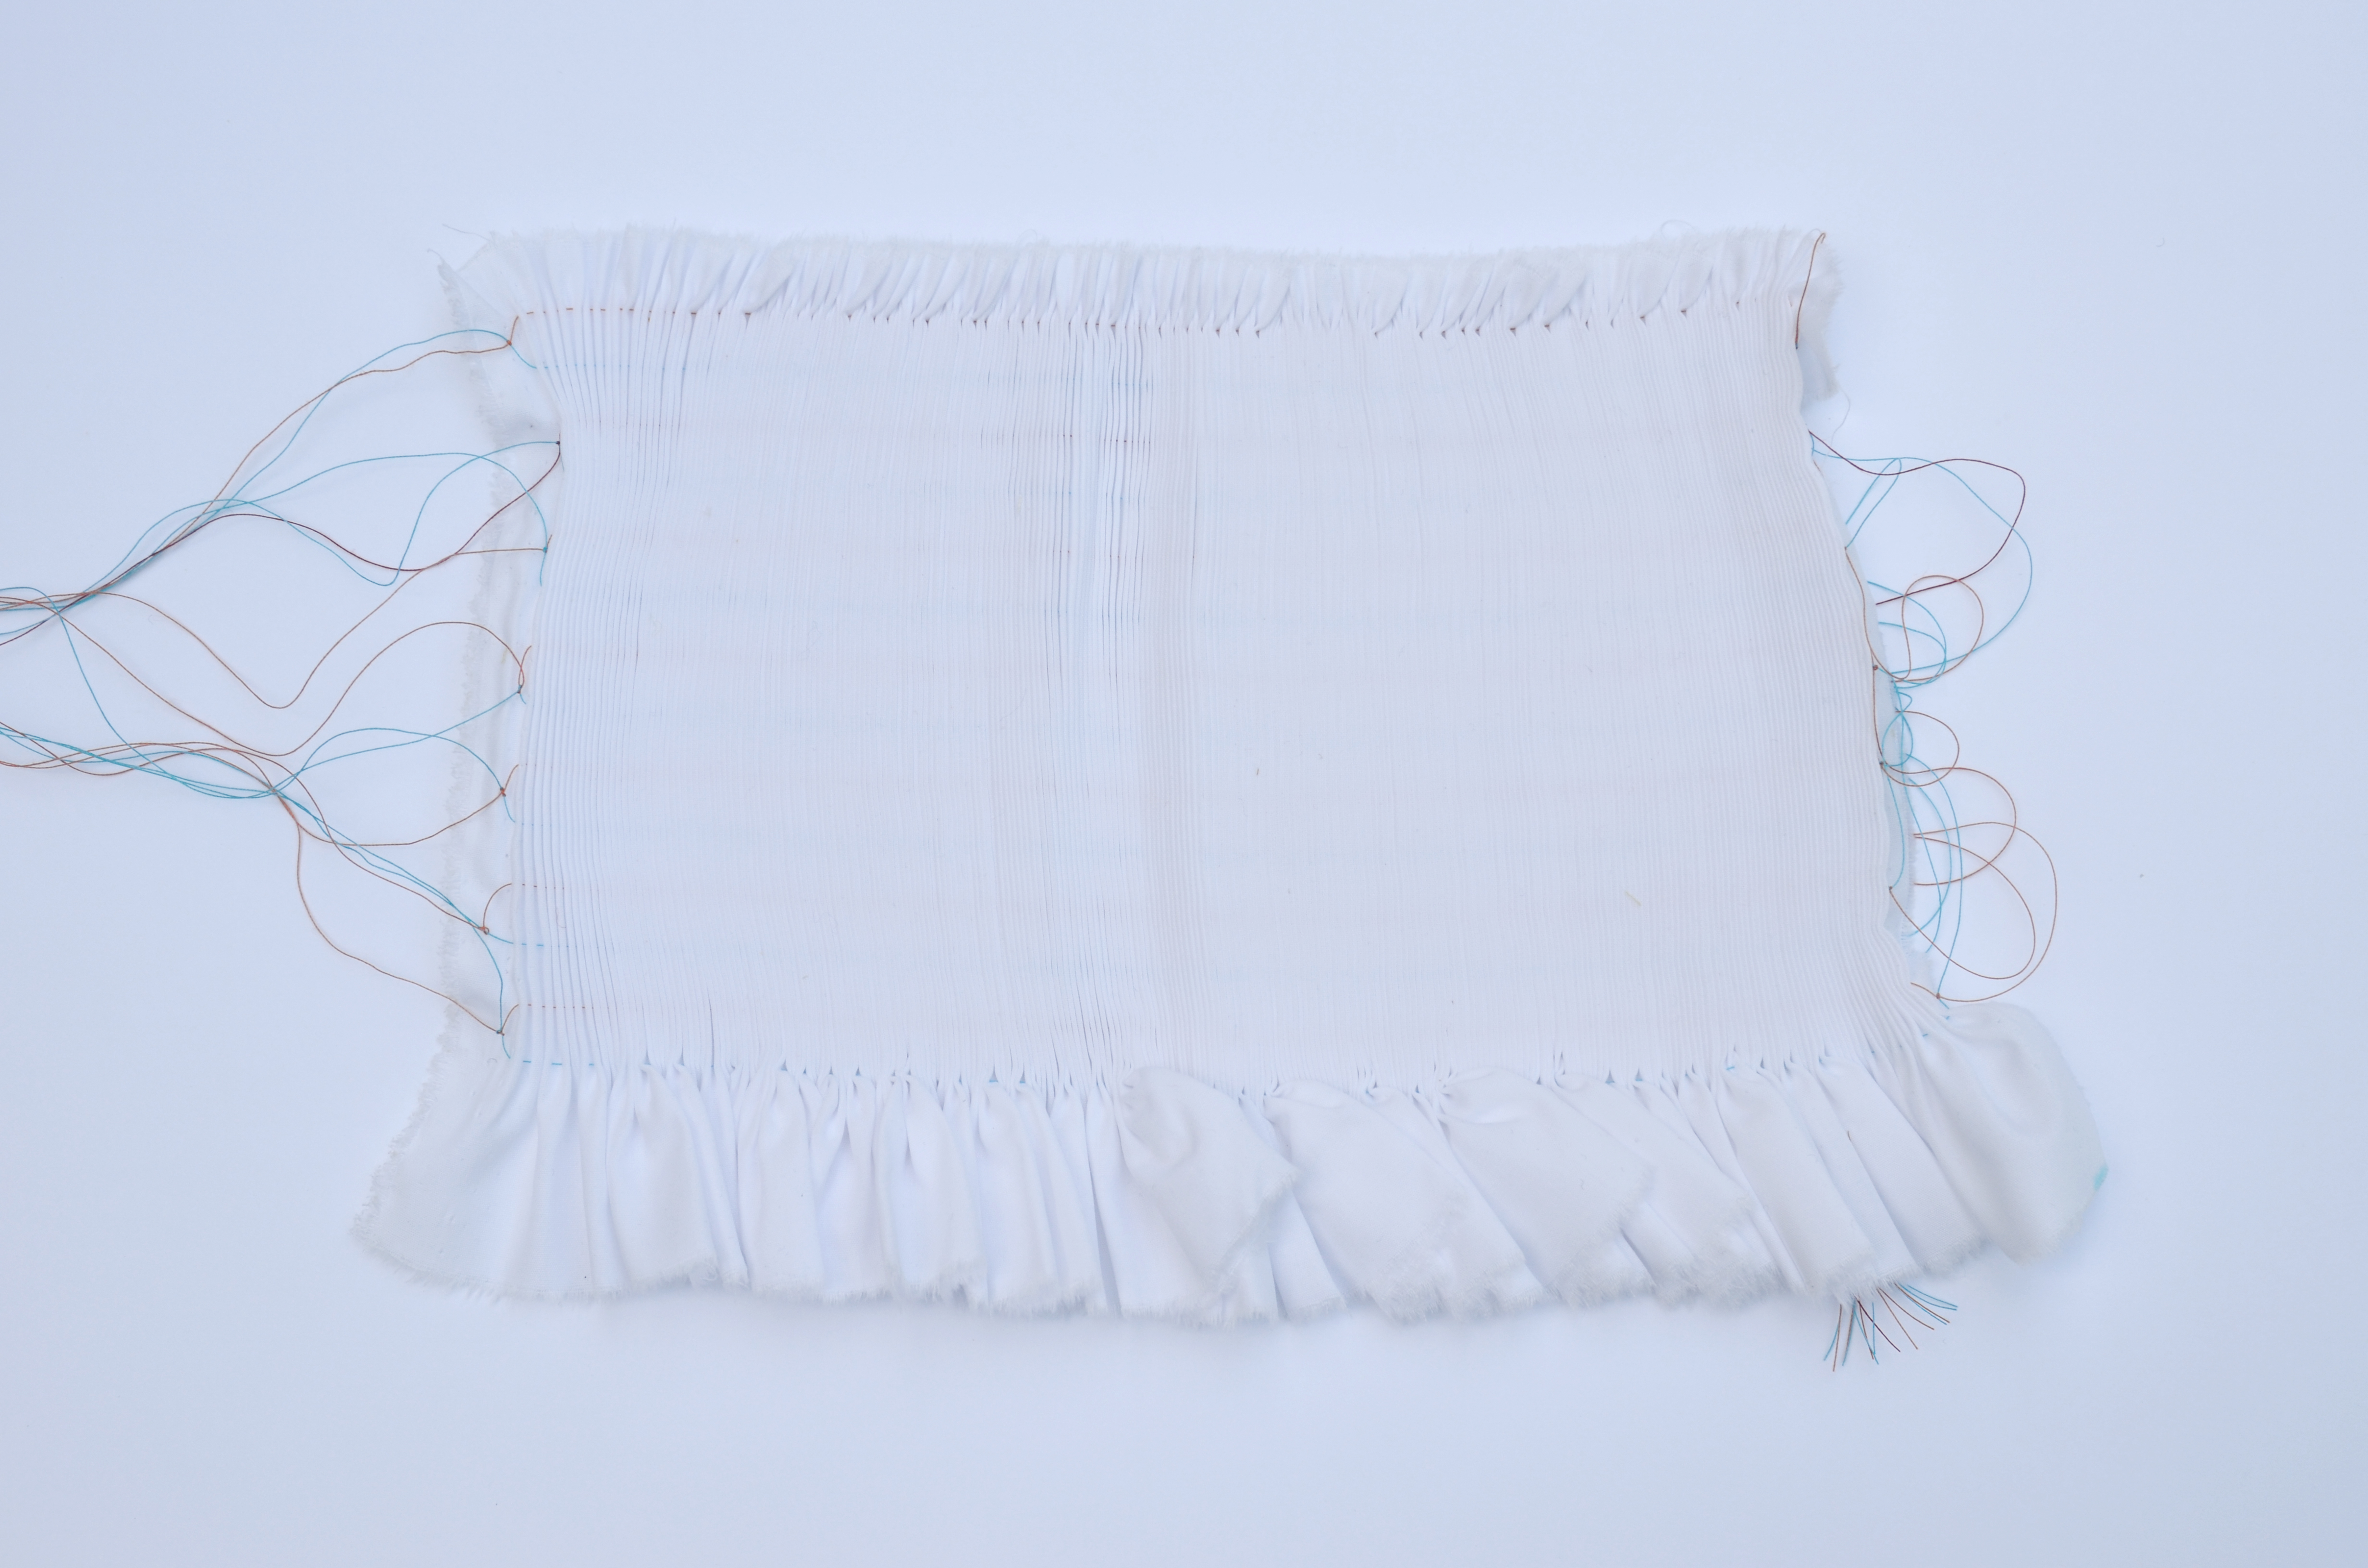
3) Determine the right and wrong side of your pleated fabric. Always remember “LONG is WRONG”. The side that your gathering stitches are the LONGest is the WRONG side of the fabric. The right side of the fabric will be the side where your gathering stitches are the shortest.
4) Prepare your thread. In our video, we are using DMC thread, but there are various types of thread that may be used in smocking. Cut a piece of thread approximately 18 inches. To prepare your thread, you are going to strip it by separating it into single strands. Then, combine the number of threads needed and thread your needle. In stitching, for your holding rows {above and below the smocking plate design} or backsmocking {used on the wrong side of the fabric when picture smocking}, you will use 2 strands of thread. If your design is a geometric one, you will use 3 strands of thread. Finally, if you are picture smocking and need more thorough coverage, you will use 4 strands of thread.
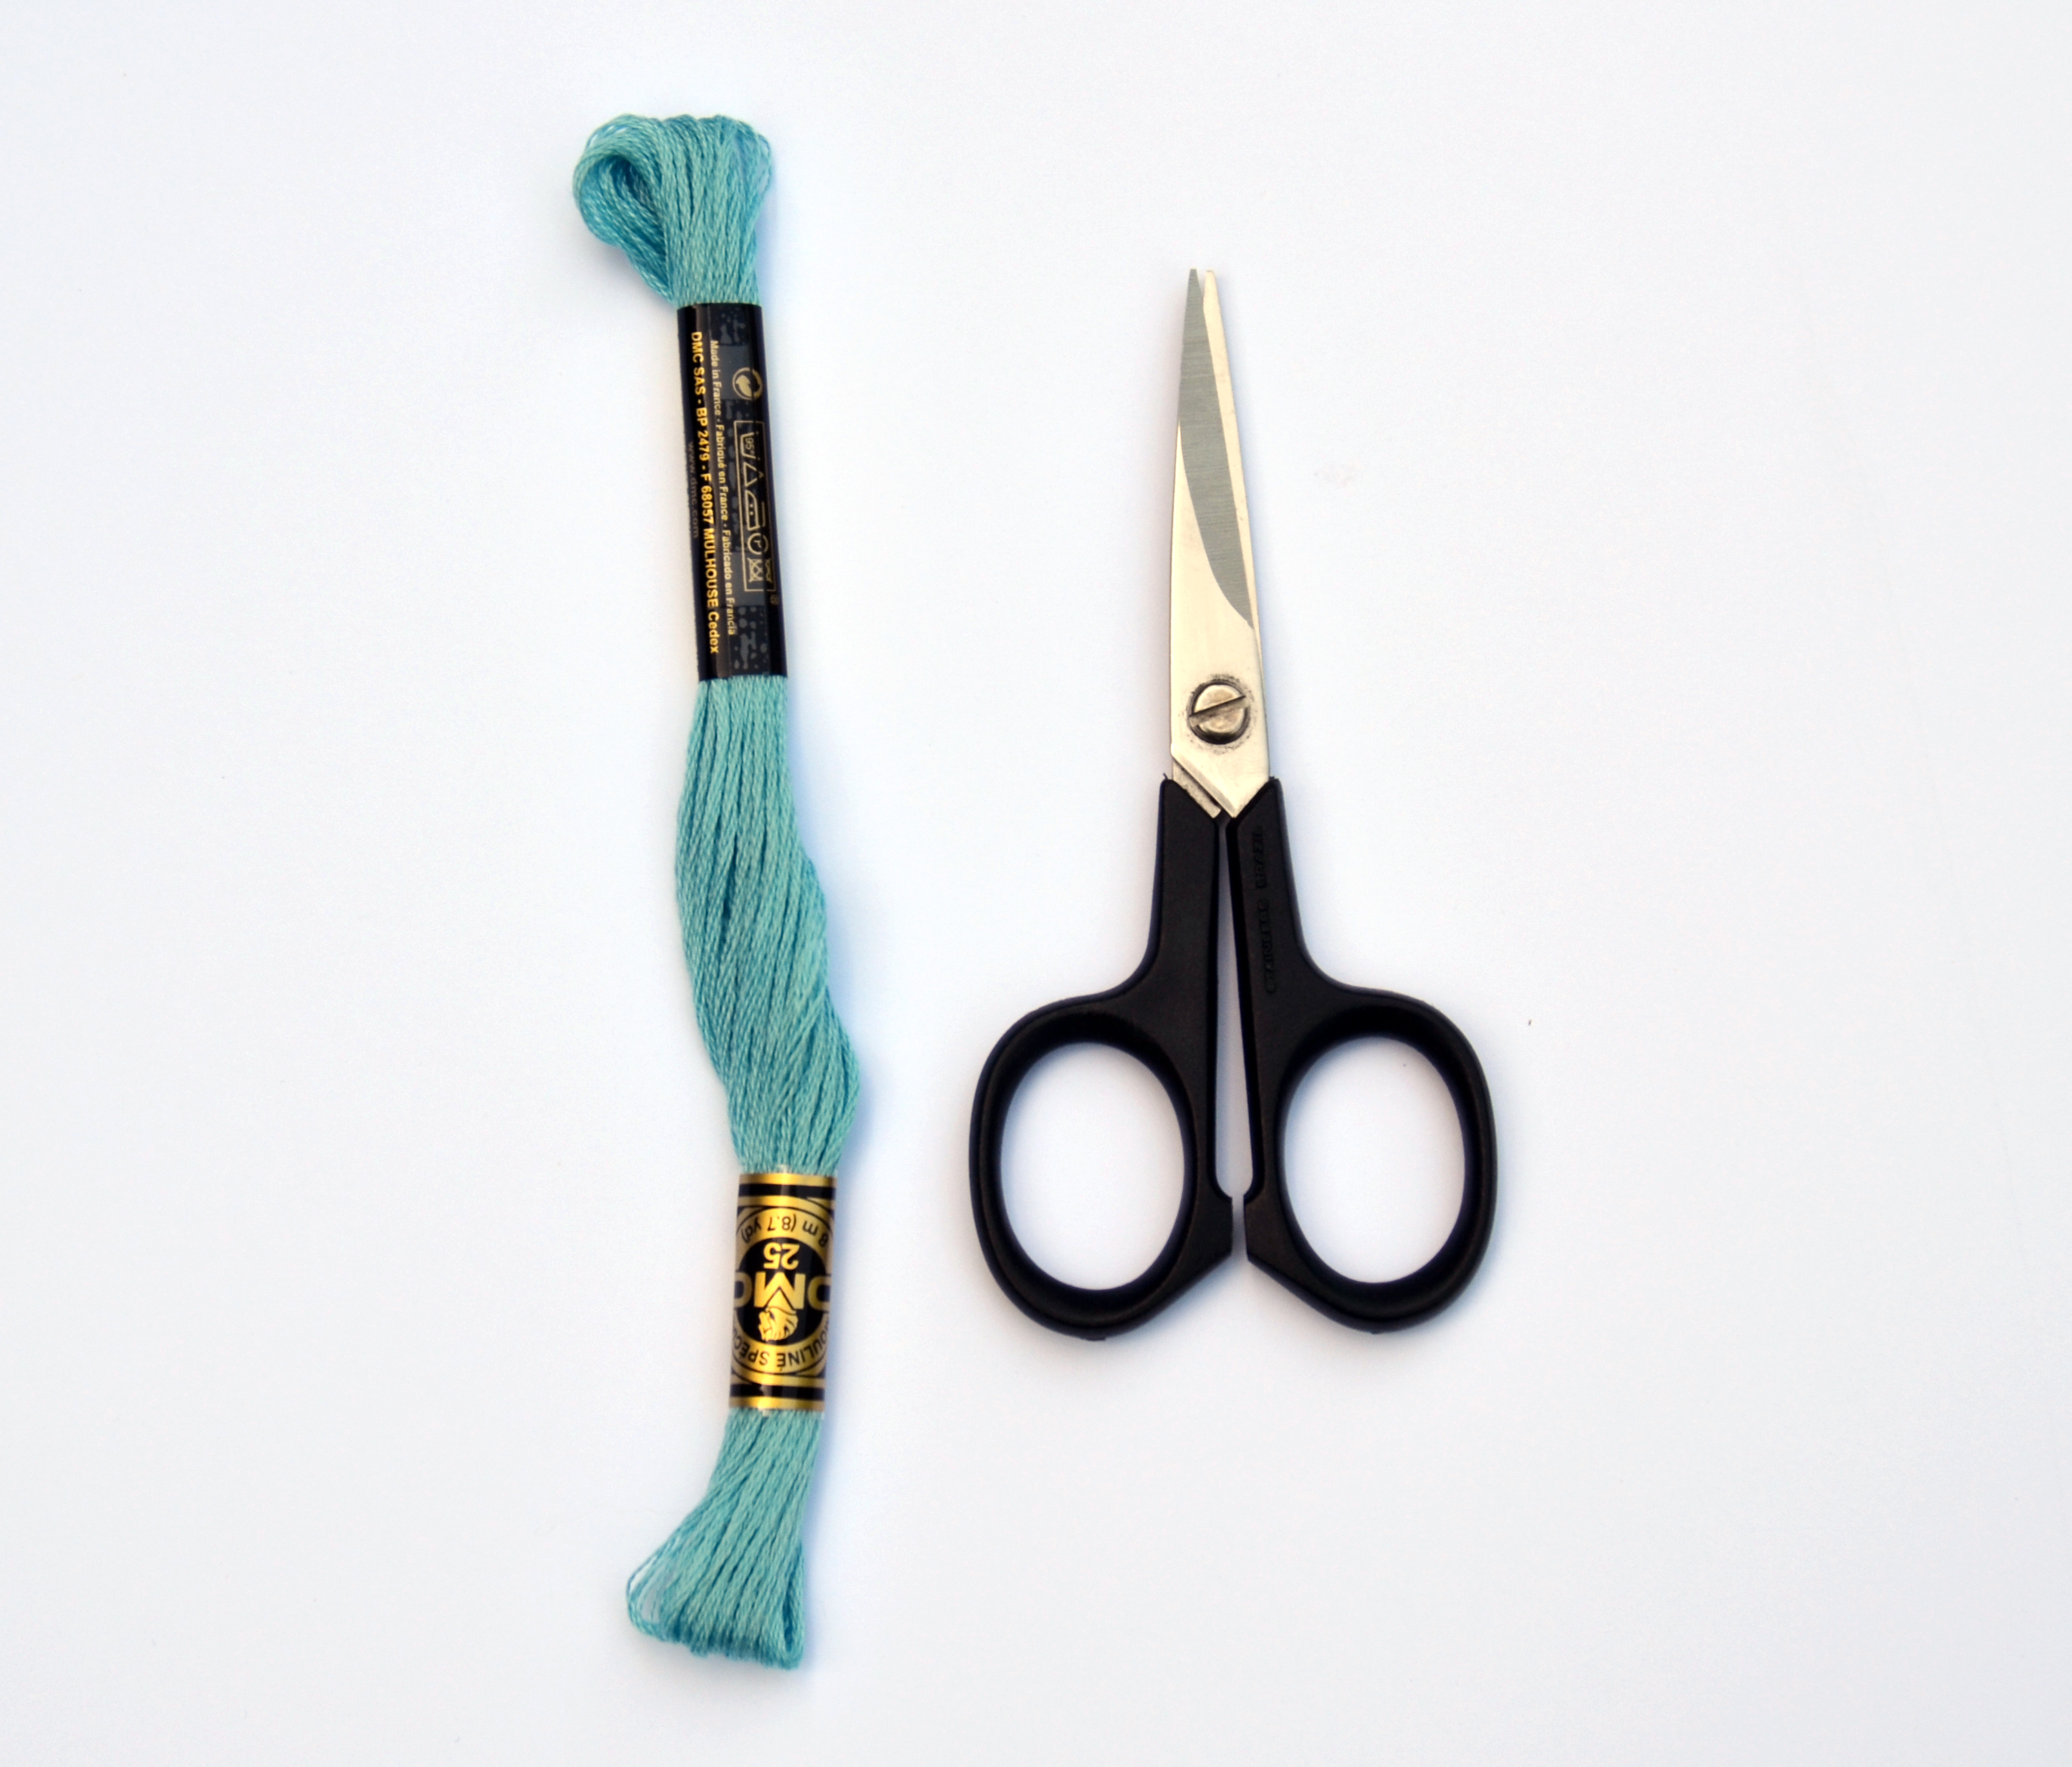
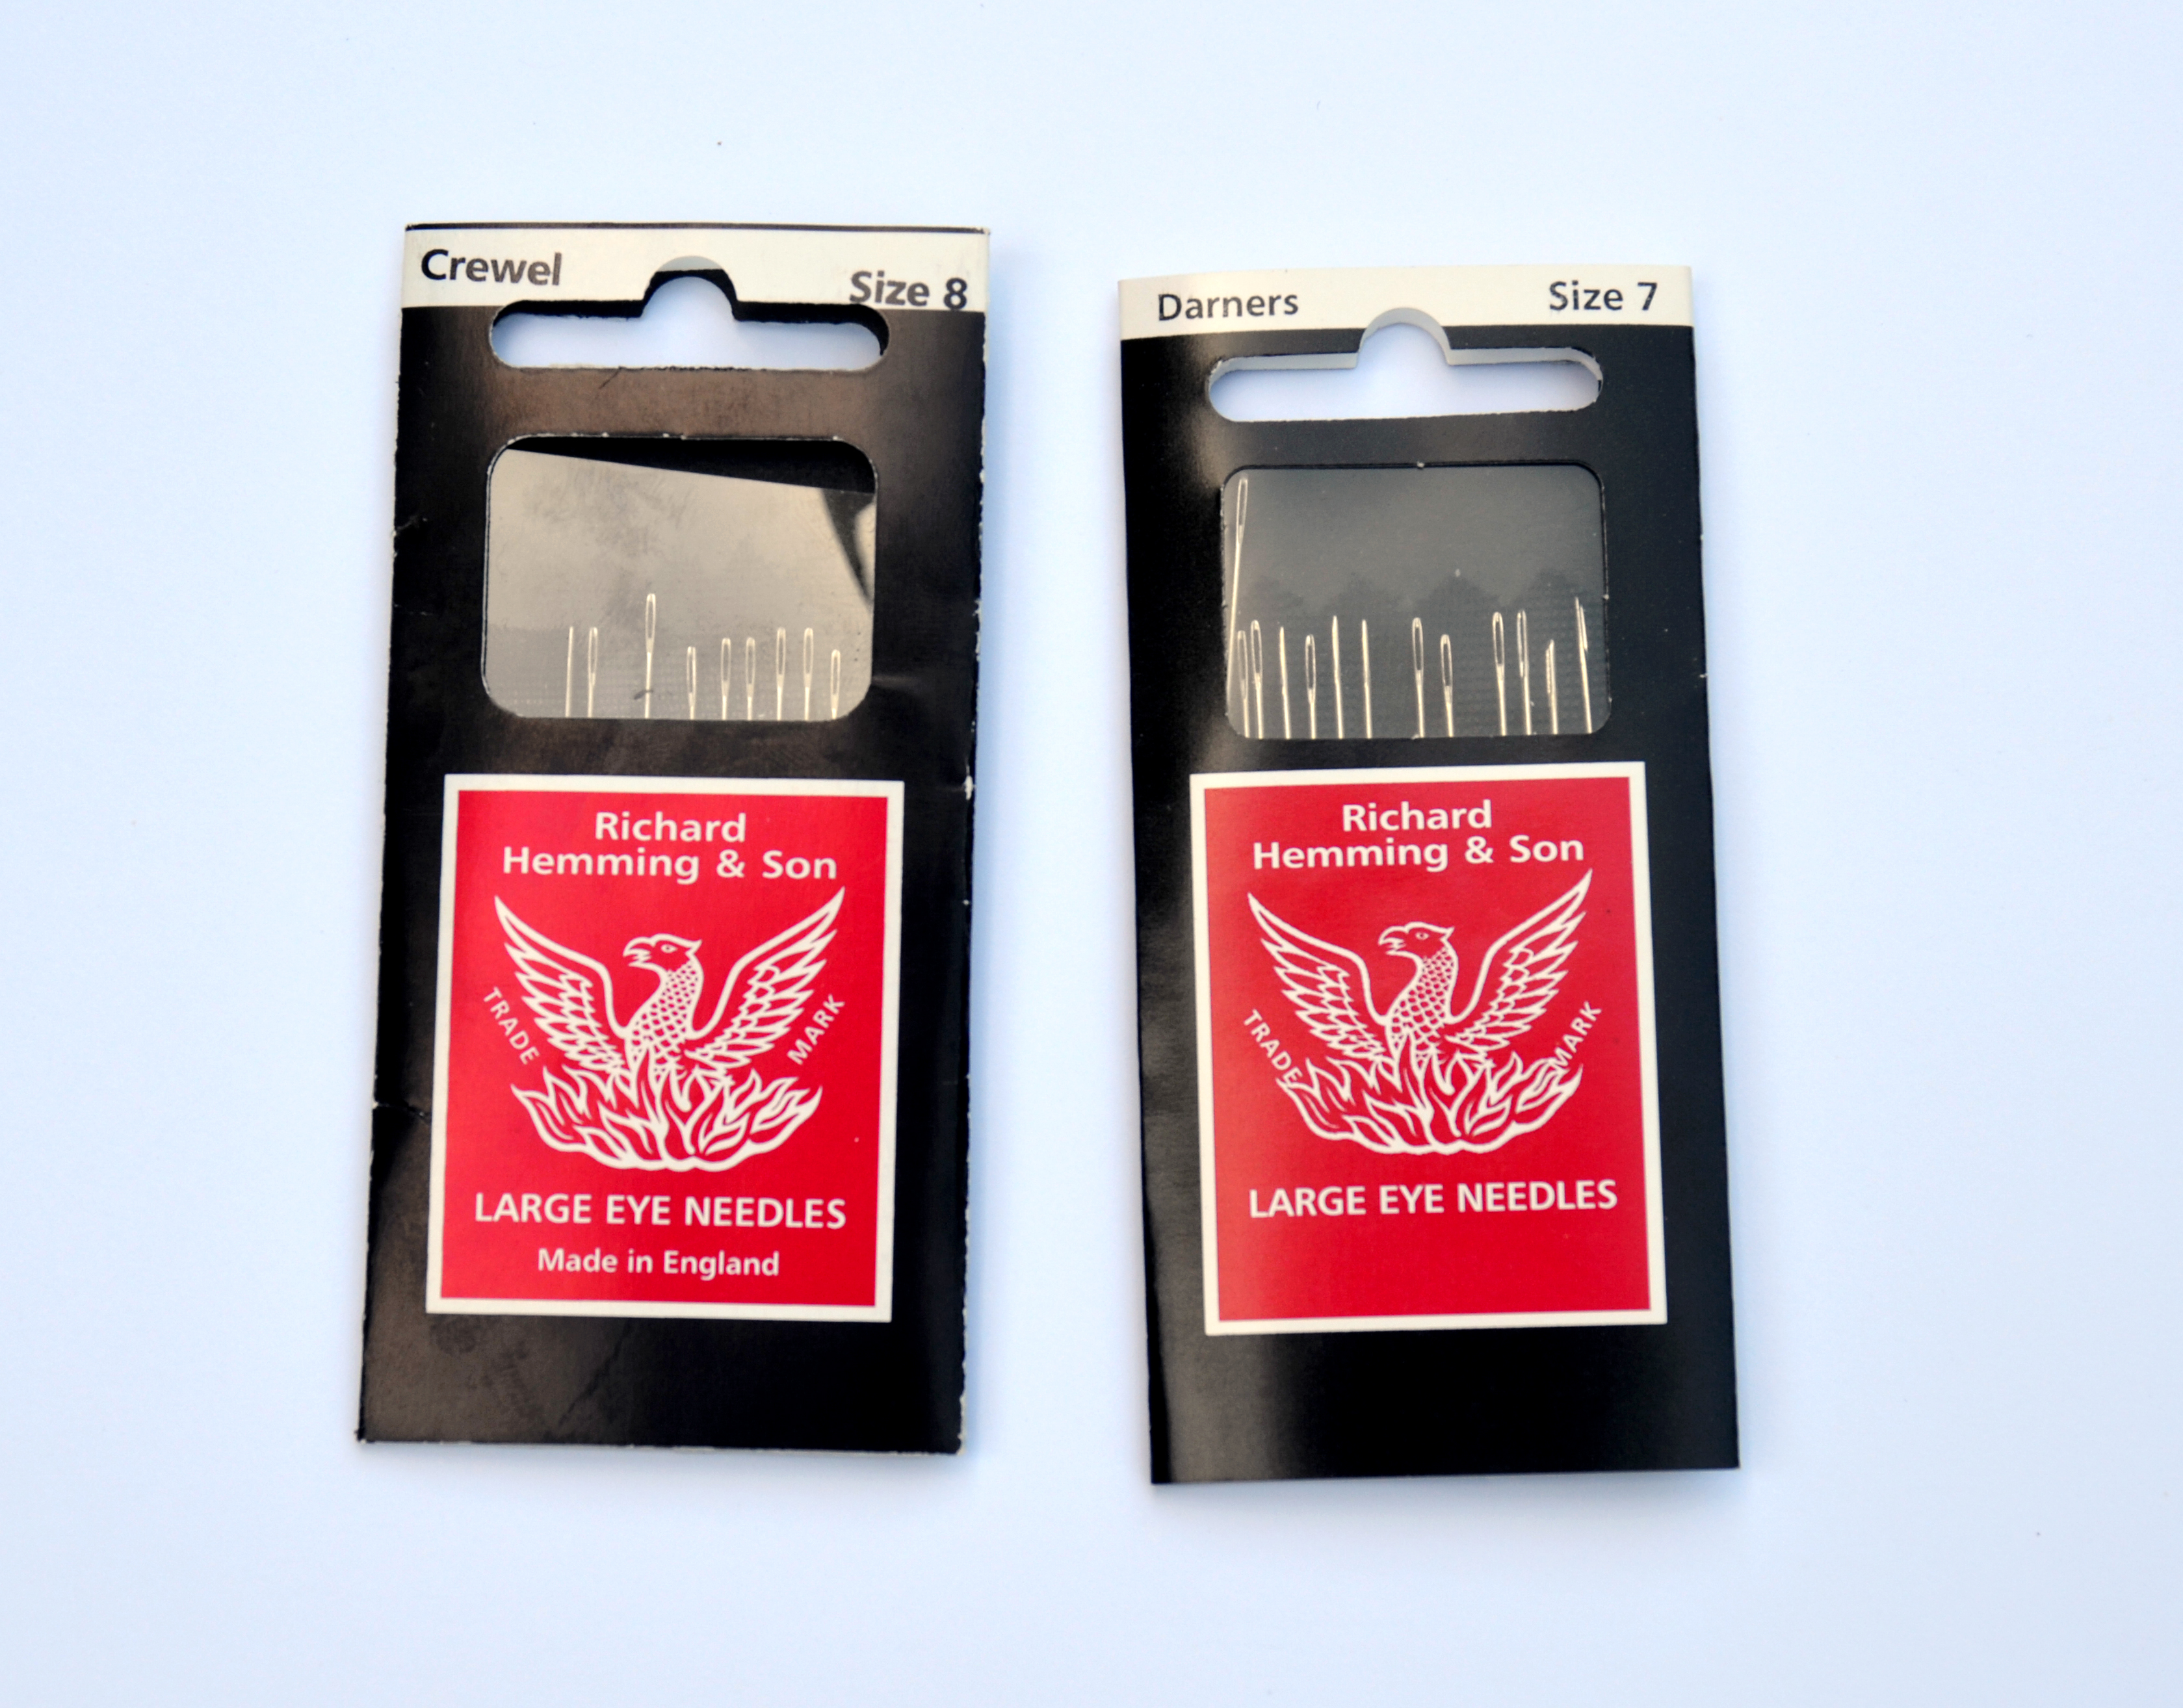
5) Choose your needle. We have never been ones to be real sticklers when it comes to choosing a needle (gasp!). From what we’ve read, it seems that the needle of choice for geometric smocking is the #8 Crewel. For picture smocking, the #7 Darner is preferred. We assume the darner would be preferred when sewing bullions also, due to its length.
And, for all you “visual learners” . . . here is the video:
Smocking: Materials and Preparation
Now, for the exciting part. . .you are officially ready to smock!!! And what’s even more exciting is that MOST of your smocking is comprised of ONLY 3 stitches used in various combinations! And to think . . . you thought it was going to be so difficult :). We also knew that we couldn’t write this entire post without giving you a taste of how simple it really is. In this next video tutorial, we will be showing you how to sew a cable stitch. This is your most basic stitch, and to say you will use it A LOT is an understatement. The cable stitch is the stitch that is used as your holding row {2 strands on the wrong side of your fabric on the top row on a bishop or yoke dress}, as well as on both the top and bottom row of a smocked insert. Also, it is often used in backsmocking. Again, you use 2 strands of floss and smock on the wrong side of the fabric, but backsmocking is often used in picture smocking and smocked behind the rows to stabilize the insert so it won’t pull where the pictures have been smocked. Finally, it is used A LOT in geometric smocking, and picture smocking is simply cable stitches stacked on top of one another!
In the video, Smocking: The Cable Stitch, we will be stitching cable stitches. Cable stitches are stitched in a horizontal line often following a row of gathering threads. The cable stitch appears similar to stacked “bricks”. If you are right-handed, you will work from the left to the right. If you are left-handed, you will work from the right to the left. If there are any “lefties” out there that are interested in seeing how to smock left-handed, give us a shout-out {Emily prefers her left hand and can smock up a storm}! Now, whether Ashley {frances} can video might be another story. . .
Even though the cable stitch appears to go up, and down, do not be fooled into thinking that you have to go up and down. It is IMPORTANT to follow the gathering row, otherwise your cable will gape and your fabric will be more likely to show between the stitching. When smocking, basically you are adding a single pleat, while pulling two pleats together in the process. When pulling the pleats together, stitch approximately the top third of the pleat’s depth, and keep your needle parallel to the gathering row and perpendicular to the pleats. This is also true of other smocking stitches. Keep your needle parallel and not angled, no matter the stitch.
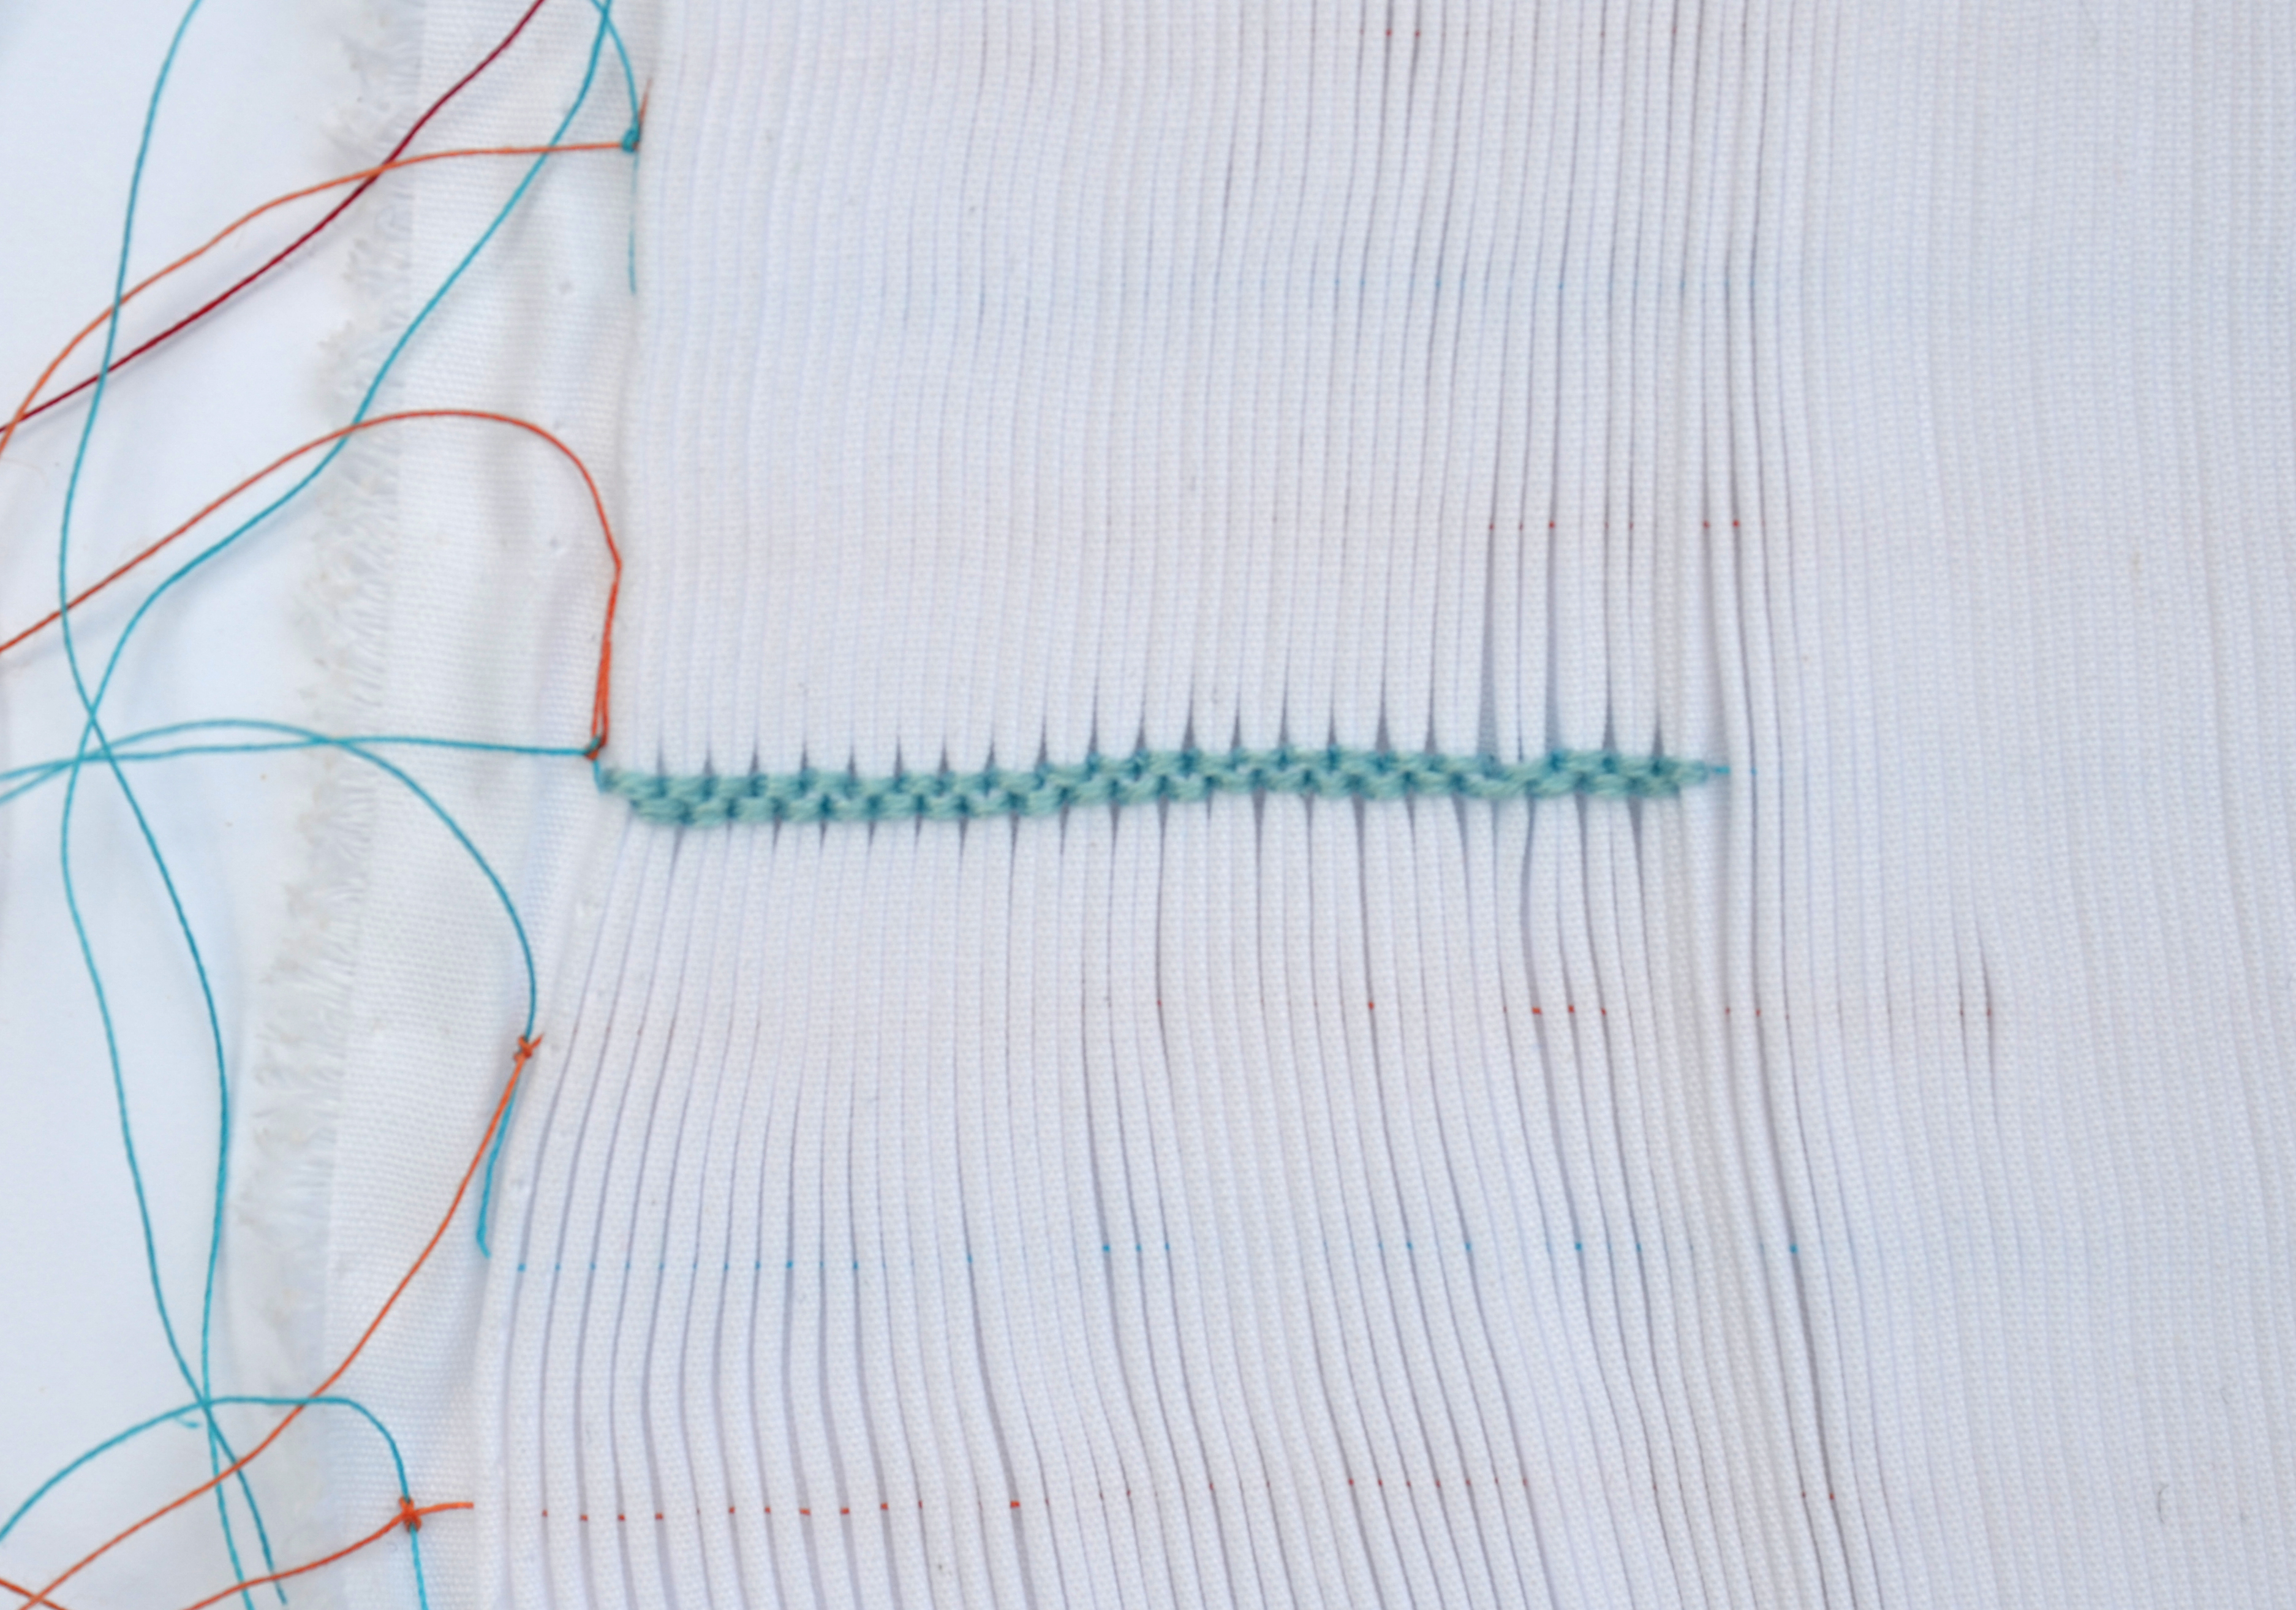
So how do you make your cables appear up and down if you don’t adjust your needle or stitch slightly above and below the gathering thread? It is actually very simple. It is all dependent on where your thread is in relation to your needle. If you are stitching a “down cable” or a “down stitch” your thread will be BELOW the needle as you are stitching. When stitching an “up cable” or an “up stitch” the thread will be ABOVE the needle. In both instances, continue to keep your needle parallel to the gathering thread.
When you have stitched your last cable or have run out of thread, simply insert your needle into the valley between the last two pleats you’ve stitched and tie off on the back of your smocking.
Now, it’s time to watch our video, Smocking: The Cable Stitch, and try your hand at smocking! Tell us what you think, what you’d like to know, share this post / video, and be sure to tag us on Facebook and/or Instagram (@francessuzanne) when you decide to give smocking “a go”! Trust us . . . you’ll love smocking, and you won’t be nearly as awed by those who smock as you once were. . .guaranteed!
Smocking: The Cable Stitch
![]()

Great job!
Thank you for featuring my plate “Amy Lynn”. Most of my plates with names were named after real people (or real, live Cabbage Patch dolls). Amy Lynn is the mother of three today. Baby Jessica just had her first child, Baby Ethan. Mollie Becca was the doll.
I wondered why you asked me about Amy Lynn on Facebook. 😉
How special to name your plates after those near and dear to you!! The “Amy Lynn” will always hold the title of my 1st smocked plate….can’t replace that :). Do you have a shop / site that we can link the Amy Lynn reference??
Great job on encouraging beginners to start smocking! It really is much easier than most believe. Your videos are wonderful as well. Keep on encouraging more moms to start smocking!!!
Thanks, Kathy!! It is SUPER easy….and we feel as if we are giving away our “secret” of the easiness of smocking. But, it’s for a good cause!
I am so glad that you are doing this series. I hope many more women will see just how rewarding this art form can be. Smocking is such a classic and beautiful detail.
We’ll leave the bullion video to YOU!!!
Thank you for doing this series its great to learn each step , Sydney Australia
Thanks Michelle!! We hope it will be helpful to those interested in learning how to smock….
You are doing a great job! And getting smocking out there to lots of new people.
Just one notation regarding needles: Milliners’ needles (aka Straw needles) are best for any stitch involving knots such as Bullions and French knots. The eye of the needle is the same size as the shaft so the wraps don’t get stuck when you try to pull the needle through. They are also lovely and long. I love them for all kinds of stitching!!
Thank you, Ms. Judith! We appreciate you adding some information regarding needles….I know we need to be more selective in our needle choices, and that there is a reason for using different needles for different stitches!!
This summer I will be away from my sewing machines and need something like this! I will probably gather the lines as well so it will keep me occupied! Did you see my recation to your previous question?
YES!! And, thank you!! It will come….just a little later than planned {keeping the nieces always slows our blogging down a bit}.
Thank you for the very helpful information! Nice job on the videos too. =)
Thanks Charity!!! It’s a BIG learning curve!!!
love this!! thanks for putting this together!! I can’t wait to try it soon!
YEA!! This tickles us….and please share your creation with us when you do :)!
“We assume the darner would be preferred when sewing bullions also, due to its length.”
This is incorrect and will make doing bullions very, VERY difficult. (Ask me how I know!!) You’ll want to use a needle where the shaft and the eye are the same circumference so that pulling the needle through all the loops on the last step isn’t so impossible.
Oops! I also wanted to mention this Martha Pullen video explaining the tails up, tails down thing. It’s hilarious, but utterly memorable!
https://www.youtube.com/watch?v=5FyB2LojM_o